I'VE MOVED! YOU CAN VISIT MY NEW BLOG AT: http://ribbonsdownmyback.blogspot.com

Thursday, March 29, 2012

Disney Wonder, The Mexican Riviera: Part I

This was our first cruise, but I've been a Disneyland fan pretty much my whole life (and so is the rest of my family). We were excepting the Disney quality and service and we definitely got that, plus more! The live shows every night were fantastic, the activities were lots of fun, the food was amazing, and the crew were awesome, especially our servers.


(note: I have so many pictures, too many to share here. If your interested in seeing/hearing more about our vacation, I posted a whole trip report on a Disney forum, which includes a post for each day of the trip, if your interested.)

Photobucket
(The Wonder looks tiny from this angle...)

On February 26th we boarded the Disney Wonder, the second oldest ship in Disney Cruise Line's (DCL) fleet and sister ship to the Disney Magic. The first two days were at sea, then 1 day at Puerto Vallarta, 2 days at Cabo San Lucas, and one more day at sea before we arrived back at LA.


Photobucket


Our first day at sea my siblings and I went up for breakfast at The Beach Blanket Buffet together. Having a doughnut with breakfast made me happy! We don't get them a home very often, so I enjoy them when we get to have them! 
Photobucket


One of my favorite activities that I did was Animation, where crew member Ponz taught us all how to draw different characters. I missed the first day with Mickey Mouse since we were watching The Muppets, but I was able to go to the rest of them. Here we have Ponz showing us how to draw Goofy.
Photobucket

And here is my finished drawing. I'm quite happy with how it turned out!

Photobucket

The day before we arrived at Puerto Vallarta, our first stop, there was a fun Mexican show up on deck at the Goofy Pool, called Minnie's Fiesta Grande. I loved seeing all the classic characters in their Mexican outfits!
Photobucket

Both Tiana and Daniel decided to buy sombreros in Puerto Vallarta!
Photobucket

In Puerto Vallarta, we went for lunch at Margarita Grill, by the suggestion of our van driver. They make the guacamole and salsa fresh at your table! Here Grandma and Grandpa are enjoying their drinks.
Photobucket

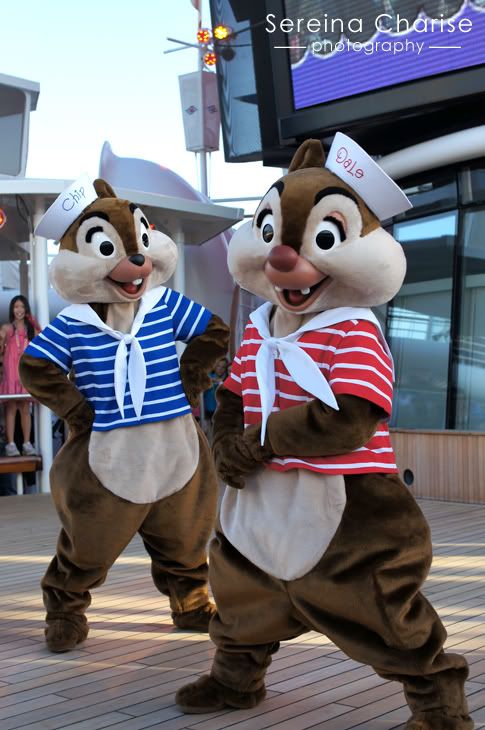
We also got to see LOTS of characters! And every day they had different outfits on as well. I'm a big character fan, so I was always getting my pictures with them! It seems to be the older I get, the more excited I am to meet them!
Photobucket

Mexican Mickey and Mexican Daniel!
Photobucket

There are three dinning rooms, and on the Wonder they are Triton's, Parrot Cay (pronounced "key), and Animator's Palate. We were really looking forward to Animator's Palate, because throughout dinner the room changes from black and white to color!
Photobucket

Here's a time lapse video my dad and I made of our table at AP:

I have more pictures to share, so I'll be working on getting part II up soon! 

Saturday, March 24, 2012

It's Been A While...

...since I've been around here. Since my last post, which was, wow, over five weeks ago, I was busy prepping for our vacation, which we left for on February 26. My whole family, plus grandma and grandpa, were able to go on one of our dream vacations: a Disney Cruise! Thanks to the Kids Sail Free promotion (which I barely made, since I turned 18 just a few days after coming home) we were able to book a really great deal last fall to cruise on the Disney Wonder to the Mexican Riviera. And it was awesome! Everything from the actives, the characters, the food, and our servers where fantastic! We all had even more fun than we thought we would and were very sad when the trip came to an end.

So until I get the rest of the photos edited and posts written up, here's one of my favorite shots of the characters from the Adventures Away! Deck Party when we left LA.

Photobucket

Thursday, February 16, 2012

Shutter Skills: Exposure Triangle

This is the first post in my new blog series, Shutter Skills. Yay! I'll be sharing my knowledge about photography so you all can improve your own photos. We'll start off with the technical stuff, which will be used later with different techniques.

So lets start with the exposure triangle. What exactly is the exposure triangle? Well it's the three elements that are used to create an image:

   -Shutter Speed
   -Aperture
   -ISO

The goal is to create a proper exposure, a photo which is nether too bright or too dark, using the three element above. When you adjust one setting, it affects the other two as well. It takes a lot of practice to get it all down, so the best thing to do is just practice, practice, practice!


Shutter Speed

The shutter speed is how long the shutter remains open while capturing an image. Slow shutter speeds let in more light, while a fast shutter speed will let in less light. Shutter speeds are measured in seconds or fractions of a second. 1/1000 is fast, while 1/40 is slow.

High shutter speeds
 are good for freezing the action...


...and
slow shutter speed can capture the feel of motion.

While hand holding, you'll want to keep your shutter speed a little bit faster than the focal length of your lens. For example, if you're shooting at 50mm, 1/60 is about the slowest you'd want to go, but if it was 200mm you wouldn't want to go lower than about 1/250. If you need to shoot at a slower shutter speed, you'll need a tripod or something to set your camera on so it doesn't move at all while the shutter is open.

Aperture
Aperture is the size of the opening in the lens when a photograph is taken. The wider open the aperture is, the more light it will let in. 

The aperture is measured in
f-stops. The smaller the f-stop, the the wider the lens is opened. For example f/2.8 is a large opening, while f/8 would have a much smaller opening.


ISO
The ISO is how sensitive the image sensor is to the light. A low ISO, such as 100-200, use less light. If you use a high ISO, your camera will use more light. Therefore, when your in a situation when you need more light, such as indoors or when it's getting dark outside, you'll want to bump up your ISO so it can capture more light. However there is a downside when using high ISO's, which is grain. The higher up the ISO goes, the more grain your image is going to have, so always try to keep your ISO as low as possible.


Camera Modes
You know that little dial on the top of your camera? The one with letters like "Tv", "Av", or "M" for Cannon users and "A", "S", and "M" for those using a Sony or Nikon? Here's what they all mean and how you can use them:


   -"Tv" or "S" is Shutter Priority. In this mode you get to choose your shutter speed and the camera will pick the aperture and the ISO. Shutter priority is great for when you want to freeze the action and stay at a higher shutter speed or when you want to do a time exposure by leaving the shutter open longer.

   -"Av" or "A" is Aperture Priority. You choose your own aperture in this mode, while the camera will choose the shutter speed and the ISO. Aperture priority is the mode I shoot in about 90% of the time. I like being able to choose my aperture, especially with portraits, and let my camera do the rest.

   -"M" is manual. You choose all three settings; aperture, shutter speed, and ISO. It's best to get familiar shooting in aperture and shutter priority before going to manual, because you'll have a lot more to think about.


Tuesday, February 14, 2012

Catching Some Zzzzz's

Doji was so cute sleeping with his head on the pillow the other day. I love having cats around the house. ♥

Photobucket

Wednesday, February 8, 2012

Cookies & Milk, Anyone?

Photobucket

Who doesn't love a good chocolate cookie? I know I sure do. Cookies are good and chocolate makes them even better.

I hadn't done any baking in quite a while, which is quite unlike me, so I though I'd remedy that by baking these tasty treats. It wasn't long before the house was filled with the yummy smell of chocolate. 

Photobucket

Chocolate Brownie Cookies

original recipe via Pure & Yummy


Ingredients:
1/2 cup butter

19oz chocolate chips
2 cups flour
1 teaspoon baking powder
1/2 teaspoon salt
4 eggs
1 1/3 cups sugar
2 teaspoons vanilla


Directions:

1. Melt butter and half of the chocolate chips in a pot stirring constantly until butter and chocolate is completely melted.

2. Beat eggs, sugar, and vanilla in an electric mixer. Gradually add the flour, baking powder, and salt until combined. Add the chocolate mixture, then the remaining chocolate chips.

3. Scoop dough onto greased baking sheets at 350°F for ten minutes. Let cool five minutes before moving to a wire rack to cool completely.

LinkWithin

Related Posts with Thumbnails